1. 서블릿
서블릿을 만들어서 jsp->servlet->jsp로 처리해 줄 수 있다.
servlet이라는 파일을 Java Resources>src>package명>servlet명 경로로 만들어 주면 된다.

여기서 주의할 사항은 package명은 com.회사명.프로젝트명 (예: com.company.project) 의 규정에 따라 만들어 준다.
서블릿과 jsp의 연동하는 예시는 아래와 같다.

처음에 서블릿을 만들 때, 서블릿명과 URL Mapping을 다르게 만들 수 있다. (보안상의 문제로 가능하다)
Mapping을 다르게 하는 방법은 아래 캡쳐와 같다.
서블릿명은 SDoGetPostBasic이라고 만들었지만, URL mappings에 Edit 버튼을 눌러 /SDoGetPost 라고 해주면, 나중에 jsp에서 SDoGetPost를 호출하면 SDoGetPostBasic 서블릿이 호출된다.


서블릿의 default 처리 방식은 get 방식이다.
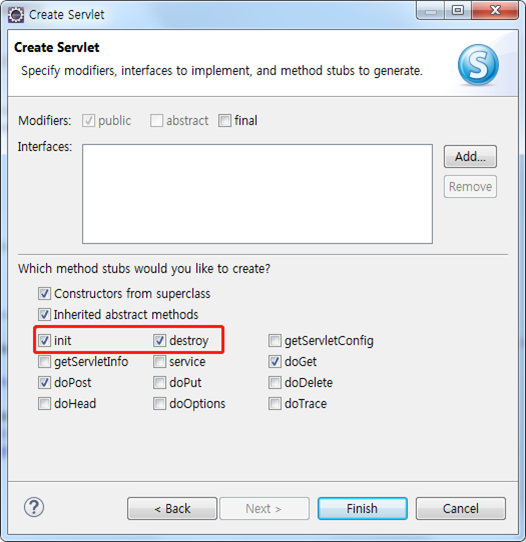
init, destroy가 언제 얼마나 발생할 수 있는지 알아 보았다.

init는 jsp가 처음 실행될 때 한 번 실행되고, destroy는 jsp 파일이 수정될 때 없어진다.
2. jsp - prompt
promt("비밀번호를 입력해주세요") 는 입력할 수 있는 알림 창을 띄운다.
Java Gui JOptionPane에서 ShowInputDialog와 유사한 기능이다.
3. java DBManager의 활용
Java 클래스에 DBManager 기능을 넣고 insert 연습문제를 풀어보았다.
Data의 Header도 글로 쓰는 것이 아닌, MetaData를 사용하여 추출해왔다.
처음 만들어 본 DBManager의 소스코드는 아래와 같다.
public class DB14Manager {
private static Connection conn;
private static Statement stmt;
private static ResultSet rset;
private String table;
public DB14Manager() {
conn = null;
stmt = null;
rset = null;
}
public static Connection getConn() {
return conn;
}
public static Statement getStmt() {
return stmt;
}
public static ResultSet getRset() {
return rset;
}
public Connection getConnection() {
try {
Class.forName("com.mysql.jdbc.Driver");
conn = DriverManager.getConnection("jdbc:mysql://localhost:3306/db명?useSSL=false","계정명","비밀번호");
if(conn==null) {System.out.println("db연동 실패");}
} catch (Exception e) {
e.printStackTrace();
}
return conn;
}
public Connection getConnection(String db) {
try {
Class.forName("com.mysql.jdbc.Driver");
conn = DriverManager.getConnection("jdbc:mysql://localhost:3306/"+db+"?useSSL=false","계정명","비밀번호");
if(conn==null) {System.out.println("db연동 실패");}
} catch (Exception e) {
e.printStackTrace();
}
return conn;
}
public Connection getConnection(String db, String table) {
try {
Class.forName("com.mysql.jdbc.Driver");
conn = DriverManager.getConnection("jdbc:mysql://localhost:3306/"+db+"?useSSL=false","계정명","비밀번호");
this.table = table;
if(conn==null) {System.out.println("db연동 실패");}
} catch (Exception e) {
e.printStackTrace();
}
return conn;
}
public String[] getDBHeader() {
String[] header = null;
try {
conn = this.getConnection();
stmt = conn.createStatement();
rset = stmt.executeQuery("select * from "+this.table);
ResultSetMetaData md = (ResultSetMetaData) rset.getMetaData();
header = new String[md.getColumnCount()];
for(int i = 0; i < header.length; i++) {
header[i] = md.getColumnLabel(i+1).toUpperCase();
}
}catch (Exception e) {
}finally {
try{ if(rset!=null) { rset.close();} }catch(Exception e){}
try{ if(stmt!=null) { stmt.close();} }catch(Exception e){}
try{ if(conn!=null) { conn.close();} }catch(Exception e){}
}
return header;
}//header 가져오는 거
}//end class
'배운 내용 정리 > WEB' 카테고리의 다른 글
| [학습정리] 2020.01.21 - 액션태그(ActionTag), 향상된 for문 (0) | 2020.01.22 |
|---|---|
| [학습정리] 2020.01.20 - mvc1 서블릿 ver 게시판 (0) | 2020.01.20 |
| [학습정리] 2020.01.10 - cookie, 웹페이지 레이아웃 만들기, 첫번째 웹페이지 완료 (0) | 2020.01.11 |
| [학습정리] 2020.01.09 - cookie, 회원가입 구현 (0) | 2020.01.10 |
| [학습정리] 2020.01.08 - session, 페이지 이동, 회원가입 구현 (0) | 2020.01.09 |